Rest Template è usato per creare applicazioni che consumano servizi web RESTful. Potete usare il metodo exchange() per consumare i servizi web per tutti i metodi HTTP. Il codice riportato di seguito mostra come creare Bean per Rest Template per auto-cablare l’oggetto Rest Template.
package com.tutorialspoint.demo;import org.springframework.boot.SpringApplication;import org.springframework.boot.autoconfigure.SpringBootApplication;import org.springframework.context.annotation.Bean;import org.springframework.web.client.RestTemplate;@SpringBootApplicationpublic class DemoApplication { public static void main(String args) { SpringApplication.run(DemoApplication.class, args); } @Bean public RestTemplate getRestTemplate() { return new RestTemplate(); }}
GET
Consumare l’API GET usando RestTemplate – exchange()
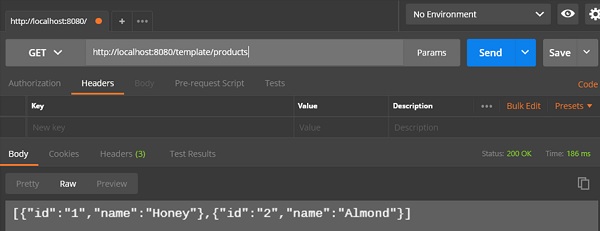
Assumiamo che questo URL http://localhost:8080/products restituisca il seguente JSON e stiamo per consumare questa risposta API utilizzando Rest Template usando il seguente codice –
Si dovranno seguire i punti indicati per consumare l’API –
- Autowired l’oggetto Rest Template.
- Utilizzare HttpHeaders per impostare le intestazioni della richiesta.
- Utilizzare HttpEntity per avvolgere l’oggetto richiesta.
- Fornire l’URL, HttpMethod, e il tipo di ritorno per il metodo Exchange().
@RestControllerpublic class ConsumeWebService { @Autowired RestTemplate restTemplate; @RequestMapping(value = "/template/products") public String getProductList() { HttpHeaders headers = new HttpHeaders(); headers.setAccept(Arrays.asList(MediaType.APPLICATION_JSON)); HttpEntity <String> entity = new HttpEntity<String>(headers); return restTemplate.exchange(" http://localhost:8080/products", HttpMethod.GET, entity, String.class).getBody(); }}
POST
Consumare POST API usando RestTemplate – exchange() method
Assumiamo che questo URL http://localhost:8080/products restituisca la risposta mostrata sotto, stiamo per consumare questa risposta API usando il Rest Template.
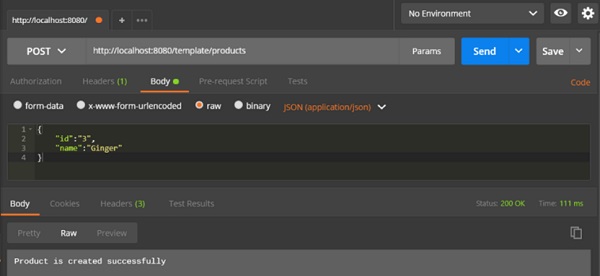
Il codice riportato di seguito è il corpo della richiesta –
{ "id":"3", "name":"Ginger"}
Il codice riportato di seguito è il corpo della risposta –
Product is created successfully
Si dovranno seguire i punti riportati di seguito per consumare l’API –
-
Autowired l’oggetto Rest Template.
-
Utilizzare l’HttpHeaders per impostare le intestazioni della richiesta.
-
Utilizzare l’HttpEntity per avvolgere l’oggetto richiesta. Qui, avvolgiamo l’oggetto Product per inviarlo nel corpo della richiesta.
-
Forniamo l’URL, HttpMethod, e il tipo di ritorno per il metodo exchange().
@RestControllerpublic class ConsumeWebService { @Autowired RestTemplate restTemplate; @RequestMapping(value = "/template/products", method = RequestMethod.POST) public String createProducts(@RequestBody Product product) { HttpHeaders headers = new HttpHeaders(); headers.setAccept(Arrays.asList(MediaType.APPLICATION_JSON)); HttpEntity<Product> entity = new HttpEntity<Product>(product,headers); return restTemplate.exchange( "http://localhost:8080/products", HttpMethod.POST, entity, String.class).getBody(); }}
PUT
Consumare PUT API usando RestTemplate – exchange() method
Assumiamo che questo URL http://localhost:8080/products/3 restituisca la seguente risposta e stiamo per consumare questa risposta API usando Rest Template.
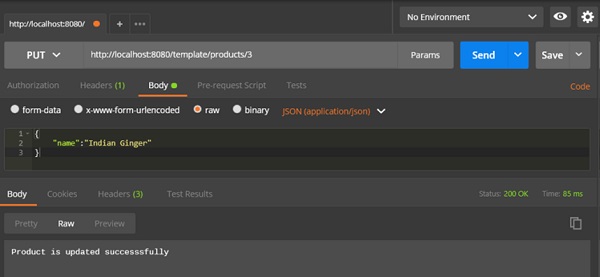
Il codice riportato di seguito è il Request body –
{ "name":"Indian Ginger"}
Il codice riportato di seguito è il Response body –
Product is updated successfully
Si dovranno seguire i punti riportati di seguito per consumare l’API –
-
Autowired il Rest Template Object.
-
Usa HttpHeaders per impostare le intestazioni della richiesta.
-
Usa HttpEntity per avvolgere l’oggetto richiesta. Qui, avvolgiamo l’oggetto Product per inviarlo nel corpo della richiesta.
-
Fornire l’URL, HttpMethod, e Return type per il metodo exchange().
@RestControllerpublic class ConsumeWebService { @Autowired RestTemplate restTemplate; @RequestMapping(value = "/template/products/{id}", method = RequestMethod.PUT) public String updateProduct(@PathVariable("id") String id, @RequestBody Product product) { HttpHeaders headers = new HttpHeaders(); headers.setAccept(Arrays.asList(MediaType.APPLICATION_JSON)); HttpEntity<Product> entity = new HttpEntity<Product>(product,headers); return restTemplate.exchange( "http://localhost:8080/products/"+id, HttpMethod.PUT, entity, String.class).getBody(); }}
DELETE
Consumare DELETE API usando RestTemplate – exchange() method
Assumiamo che questo URL http://localhost:8080/products/3 restituisca la risposta data qui sotto e noi stiamo per consumare questa risposta API usando Rest Template.
Questa linea di codice mostrata sotto è il corpo della risposta –
Product is deleted successfully
Dovrete seguire i punti mostrati sotto per consumare l’API –
-
Autowired l’oggetto Rest Template.
-
Utilizzare HttpHeaders per impostare le intestazioni della richiesta.
-
Utilizzare HttpEntity per avvolgere l’oggetto richiesta.
-
Fornire l’URL, HttpMethod, e Return type per il metodo exchange().
@RestControllerpublic class ConsumeWebService { @Autowired RestTemplate restTemplate; @RequestMapping(value = "/template/products/{id}", method = RequestMethod.DELETE) public String deleteProduct(@PathVariable("id") String id) { HttpHeaders headers = new HttpHeaders(); headers.setAccept(Arrays.asList(MediaType.APPLICATION_JSON)); HttpEntity<Product> entity = new HttpEntity<Product>(headers); return restTemplate.exchange( "http://localhost:8080/products/"+id, HttpMethod.DELETE, entity, String.class).getBody(); }}
Il file completo della classe Rest Template Controller è dato qui sotto –
package com.tutorialspoint.demo.controller;import java.util.Arrays;import org.springframework.beans.factory.annotation.Autowired;import org.springframework.http.HttpEntity;import org.springframework.http.HttpHeaders;import org.springframework.http.HttpMethod;import org.springframework.http.MediaType;import org.springframework.web.bind.annotation.PathVariable;import org.springframework.web.bind.annotation.RequestBody;import org.springframework.web.bind.annotation.RequestMapping;import org.springframework.web.bind.annotation.RequestMethod;import org.springframework.web.bind.annotation.RestController;import org.springframework.web.client.RestTemplate;import com.tutorialspoint.demo.model.Product;@RestControllerpublic class ConsumeWebService { @Autowired RestTemplate restTemplate; @RequestMapping(value = "/template/products") public String getProductList() { HttpHeaders headers = new HttpHeaders(); headers.setAccept(Arrays.asList(MediaType.APPLICATION_JSON)); HttpEntity<String> entity = new HttpEntity<String>(headers); return restTemplate.exchange( "http://localhost:8080/products", HttpMethod.GET, entity, String.class).getBody(); } @RequestMapping(value = "/template/products", method = RequestMethod.POST) public String createProducts(@RequestBody Product product) { HttpHeaders headers = new HttpHeaders(); headers.setAccept(Arrays.asList(MediaType.APPLICATION_JSON)); HttpEntity<Product> entity = new HttpEntity<Product>(product,headers); return restTemplate.exchange( "http://localhost:8080/products", HttpMethod.POST, entity, String.class).getBody(); } @RequestMapping(value = "/template/products/{id}", method = RequestMethod.PUT) public String updateProduct(@PathVariable("id") String id, @RequestBody Product product) { HttpHeaders headers = new HttpHeaders(); headers.setAccept(Arrays.asList(MediaType.APPLICATION_JSON)); HttpEntity<Product> entity = new HttpEntity<Product>(product,headers); return restTemplate.exchange( "http://localhost:8080/products/"+id, HttpMethod.PUT, entity, String.class).getBody(); } @RequestMapping(value = "/template/products/{id}", method = RequestMethod.DELETE) public String deleteProduct(@PathVariable("id") String id) { HttpHeaders headers = new HttpHeaders(); headers.setAccept(Arrays.asList(MediaType.APPLICATION_JSON)); HttpEntity<Product> entity = new HttpEntity<Product>(headers); return restTemplate.exchange( "http://localhost:8080/products/"+id, HttpMethod.DELETE, entity, String.class).getBody(); }}
Il codice della classe Spring Boot Application – DemoApplication.java è dato di seguito –
package com.tutorialspoint.demo;import org.springframework.boot.SpringApplication;import org.springframework.boot.autoconfigure.SpringBootApplication;@SpringBootApplicationpublic class DemoApplication { public static void main(String args) { SpringApplication.run(DemoApplication.class, args); }}
Il codice per Maven build – pom.xml è dato di seguito –
<?xml version = "1.0" encoding = "UTF-8"?><project xmlns = "http://maven.apache.org/POM/4.0.0" xmlns:xsi = "http://www.w3.org/2001/XMLSchema-instance" xsi:schemaLocation = "http://maven.apache.org/POM/4.0.0 http://maven.apache.org/xsd/maven-4.0.0.xsd"> <modelVersion>4.0.0</modelVersion> <groupId>com.tutorialspoint</groupId> <artifactId>demo</artifactId> <version>0.0.1-SNAPSHOT</version> <packaging>jar</packaging> <name>demo</name> <description>Demo project for Spring Boot</description> <parent> <groupId>org.springframework.boot</groupId> <artifactId>spring-boot-starter-parent</artifactId> <version>1.5.8.RELEASE</version> <relativePath/> </parent> <properties> <project.build.sourceEncoding>UTF-8</project.build.sourceEncoding> <project.reporting.outputEncoding>UTF-8</project.reporting.outputEncoding> <java.version>1.8</java.version> </properties> <dependencies> <dependency> <groupId>org.springframework.boot</groupId> <artifactId>spring-boot-starter-web</artifactId> </dependency> <dependency> <groupId>org.springframework.boot</groupId> <artifactId>spring-boot-starter-test</artifactId> <scope>test</scope> </dependency> </dependencies> <build> <plugins> <plugin> <groupId>org.springframework.boot</groupId> <artifactId>spring-boot-maven-plugin</artifactId> </plugin> </plugins> </build> </project>
Il codice per Gradle Build – build.gradle è dato di seguito –
buildscript { ext { springBootVersion = '1.5.8.RELEASE' } repositories { mavenCentral() } dependencies { classpath("org.springframework.boot:spring-boot-gradle-plugin:${springBootVersion}") }}apply plugin: 'java'apply plugin: 'eclipse'apply plugin: 'org.springframework.boot'group = 'com.tutorialspoint'version = '0.0.1-SNAPSHOT'sourceCompatibility = 1.8repositories { mavenCentral()}dependencies { compile('org.springframework.boot:spring-boot-starter-web') testCompile('org.springframework.boot:spring-boot-starter-test')}
È possibile creare un file JAR eseguibile, ed eseguire l’applicazione Spring Boot utilizzando i seguenti comandi Maven o Gradle –
Per Maven, puoi usare il comando dato qui sotto –
mvn clean install
Dopo “BUILD SUCCESS”, puoi trovare il file JAR nella directory di destinazione.
Per Gradle, puoi usare il comando mostrato qui sotto –
gradle clean build
Dopo “BUILD SUCCESSFUL”, puoi trovare il file JAR nella directory build/libs.
Ora, esegui il file JAR usando il seguente comando –
java –jar <JARFILE>
Ora, l’applicazione è partita sulla porta 8080 di Tomcat.

Ora colpisci i seguenti URL nell’applicazione POSTMAN e potrai vedere l’output.
GET Products by Rest Template – http://localhost:8080/template/products
Crea Prodotti POST – http://localhost:8080/template/products
Aggiorna Prodotto PUT – http://localhost:8080/template/products/3
Cancella Prodotto – http://localhost:8080/template/products/3
