Rest Template wordt gebruikt om applicaties te maken die RESTful Web Services consumeren. Je kunt de exchange() methode gebruiken om de web services te consumeren voor alle HTTP methoden. De onderstaande code toont hoe je een Bean voor Rest Template maakt om het Rest Template object automatisch te bedraden.
package com.tutorialspoint.demo;import org.springframework.boot.SpringApplication;import org.springframework.boot.autoconfigure.SpringBootApplication;import org.springframework.context.annotation.Bean;import org.springframework.web.client.RestTemplate;@SpringBootApplicationpublic class DemoApplication { public static void main(String args) { SpringApplication.run(DemoApplication.class, args); } @Bean public RestTemplate getRestTemplate() { return new RestTemplate(); }}
GET
Consumeren van de GET API door gebruik te maken van RestTemplate – exchange() methode
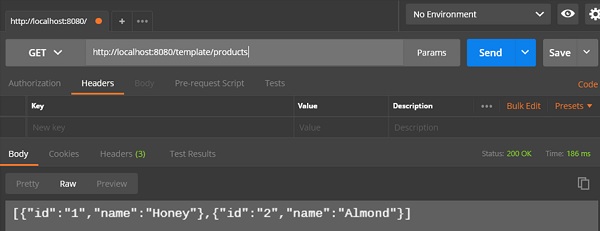
Aanname dat deze URL http://localhost:8080/products de volgende JSON retourneert en dat we deze API-respons gaan consumeren met behulp van Rest Template met behulp van de volgende code –
U moet de gegeven punten volgen om de API te consumeren –
- Het Rest Template-object activeren.
- Gebruik HttpHeaders om de Request Headers in te stellen.
- Gebruik HttpEntity om het request object te omhullen.
- Verstrek de URL, HttpMethod, en Return type voor Exchange() methode.
@RestControllerpublic class ConsumeWebService { @Autowired RestTemplate restTemplate; @RequestMapping(value = "/template/products") public String getProductList() { HttpHeaders headers = new HttpHeaders(); headers.setAccept(Arrays.asList(MediaType.APPLICATION_JSON)); HttpEntity <String> entity = new HttpEntity<String>(headers); return restTemplate.exchange(" http://localhost:8080/products", HttpMethod.GET, entity, String.class).getBody(); }}
POST
Option POST API by using RestTemplate – exchange() method
Aannemende dat deze URL http://localhost:8080/products de hieronder getoonde respons retourneert, gaan we deze API respons consumeren door gebruik te maken van de Rest Template.
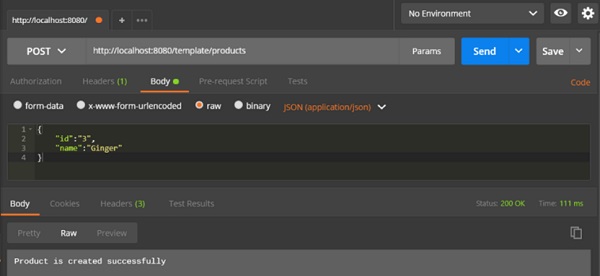
De onderstaande code is de Request body –
{ "id":"3", "name":"Ginger"}
De onderstaande code is de Response body –
Product is created successfully
U dient de onderstaande punten te volgen om de API te consumeren –
-
Het Rest Template-object te activeren.
-
Gebruik de HttpHeaders om de Request Headers in te stellen.
-
Gebruik de HttpEntity om het request-object te omhullen. Hier omhullen we het Product-object om het naar de request body te sturen.
-
Verstrek de URL, HttpMethod en het Return type voor exchange() method.
@RestControllerpublic class ConsumeWebService { @Autowired RestTemplate restTemplate; @RequestMapping(value = "/template/products", method = RequestMethod.POST) public String createProducts(@RequestBody Product product) { HttpHeaders headers = new HttpHeaders(); headers.setAccept(Arrays.asList(MediaType.APPLICATION_JSON)); HttpEntity<Product> entity = new HttpEntity<Product>(product,headers); return restTemplate.exchange( "http://localhost:8080/products", HttpMethod.POST, entity, String.class).getBody(); }}
PUT
PUT API gebruiken met RestTemplate – exchange() methode
Aanname dat deze URL http://localhost:8080/products/3 de onderstaande respons retourneert en dat we deze API-respons gaan gebruiken met Rest Template.
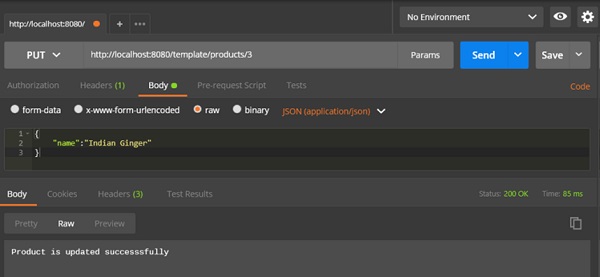
De onderstaande code is de Request body –
{ "name":"Indian Ginger"}
De onderstaande code is de Response body –
Product is updated successfully
U dient de onderstaande punten te volgen om de API te consumeren –
-
Het Rest Template-object te activeren.
-
Gebruik HttpHeaders om de Request Headers in te stellen.
-
Gebruik HttpEntity om het request-object te omhullen. Hier omhullen we het Product-object om het naar de request body te sturen.
-
Verstrek de URL, HttpMethod en het Return type voor exchange() method.
@RestControllerpublic class ConsumeWebService { @Autowired RestTemplate restTemplate; @RequestMapping(value = "/template/products/{id}", method = RequestMethod.PUT) public String updateProduct(@PathVariable("id") String id, @RequestBody Product product) { HttpHeaders headers = new HttpHeaders(); headers.setAccept(Arrays.asList(MediaType.APPLICATION_JSON)); HttpEntity<Product> entity = new HttpEntity<Product>(product,headers); return restTemplate.exchange( "http://localhost:8080/products/"+id, HttpMethod.PUT, entity, String.class).getBody(); }}
DELETE
De DELETE API gebruiken met RestTemplate – exchange() methode
Aannemende dat deze URL http://localhost:8080/products/3 de hieronder gegeven respons retourneert en dat we deze API-respons gaan gebruiken met behulp van RestTemplate.
De onderstaande regel code is de respons –
Product is deleted successfully
U dient de onderstaande punten te volgen om de API te consumeren –
-
Het Rest Template-object te activeren.
-
Gebruik HttpHeaders om de Request Headers in te stellen.
-
Gebruik HttpEntity om het request object te omhullen.
-
Verstrek de URL, HttpMethod en het Return type voor de exchange() methode.
@RestControllerpublic class ConsumeWebService { @Autowired RestTemplate restTemplate; @RequestMapping(value = "/template/products/{id}", method = RequestMethod.DELETE) public String deleteProduct(@PathVariable("id") String id) { HttpHeaders headers = new HttpHeaders(); headers.setAccept(Arrays.asList(MediaType.APPLICATION_JSON)); HttpEntity<Product> entity = new HttpEntity<Product>(headers); return restTemplate.exchange( "http://localhost:8080/products/"+id, HttpMethod.DELETE, entity, String.class).getBody(); }}
Het volledige Rest Template Controller-klassebestand wordt hieronder gegeven –
package com.tutorialspoint.demo.controller;import java.util.Arrays;import org.springframework.beans.factory.annotation.Autowired;import org.springframework.http.HttpEntity;import org.springframework.http.HttpHeaders;import org.springframework.http.HttpMethod;import org.springframework.http.MediaType;import org.springframework.web.bind.annotation.PathVariable;import org.springframework.web.bind.annotation.RequestBody;import org.springframework.web.bind.annotation.RequestMapping;import org.springframework.web.bind.annotation.RequestMethod;import org.springframework.web.bind.annotation.RestController;import org.springframework.web.client.RestTemplate;import com.tutorialspoint.demo.model.Product;@RestControllerpublic class ConsumeWebService { @Autowired RestTemplate restTemplate; @RequestMapping(value = "/template/products") public String getProductList() { HttpHeaders headers = new HttpHeaders(); headers.setAccept(Arrays.asList(MediaType.APPLICATION_JSON)); HttpEntity<String> entity = new HttpEntity<String>(headers); return restTemplate.exchange( "http://localhost:8080/products", HttpMethod.GET, entity, String.class).getBody(); } @RequestMapping(value = "/template/products", method = RequestMethod.POST) public String createProducts(@RequestBody Product product) { HttpHeaders headers = new HttpHeaders(); headers.setAccept(Arrays.asList(MediaType.APPLICATION_JSON)); HttpEntity<Product> entity = new HttpEntity<Product>(product,headers); return restTemplate.exchange( "http://localhost:8080/products", HttpMethod.POST, entity, String.class).getBody(); } @RequestMapping(value = "/template/products/{id}", method = RequestMethod.PUT) public String updateProduct(@PathVariable("id") String id, @RequestBody Product product) { HttpHeaders headers = new HttpHeaders(); headers.setAccept(Arrays.asList(MediaType.APPLICATION_JSON)); HttpEntity<Product> entity = new HttpEntity<Product>(product,headers); return restTemplate.exchange( "http://localhost:8080/products/"+id, HttpMethod.PUT, entity, String.class).getBody(); } @RequestMapping(value = "/template/products/{id}", method = RequestMethod.DELETE) public String deleteProduct(@PathVariable("id") String id) { HttpHeaders headers = new HttpHeaders(); headers.setAccept(Arrays.asList(MediaType.APPLICATION_JSON)); HttpEntity<Product> entity = new HttpEntity<Product>(headers); return restTemplate.exchange( "http://localhost:8080/products/"+id, HttpMethod.DELETE, entity, String.class).getBody(); }}
De code voor Spring Boot Application Class – DemoApplication.java wordt hieronder gegeven –
package com.tutorialspoint.demo;import org.springframework.boot.SpringApplication;import org.springframework.boot.autoconfigure.SpringBootApplication;@SpringBootApplicationpublic class DemoApplication { public static void main(String args) { SpringApplication.run(DemoApplication.class, args); }}
De code voor Maven build – pom.xml wordt hieronder gegeven –
<?xml version = "1.0" encoding = "UTF-8"?><project xmlns = "http://maven.apache.org/POM/4.0.0" xmlns:xsi = "http://www.w3.org/2001/XMLSchema-instance" xsi:schemaLocation = "http://maven.apache.org/POM/4.0.0 http://maven.apache.org/xsd/maven-4.0.0.xsd"> <modelVersion>4.0.0</modelVersion> <groupId>com.tutorialspoint</groupId> <artifactId>demo</artifactId> <version>0.0.1-SNAPSHOT</version> <packaging>jar</packaging> <name>demo</name> <description>Demo project for Spring Boot</description> <parent> <groupId>org.springframework.boot</groupId> <artifactId>spring-boot-starter-parent</artifactId> <version>1.5.8.RELEASE</version> <relativePath/> </parent> <properties> <project.build.sourceEncoding>UTF-8</project.build.sourceEncoding> <project.reporting.outputEncoding>UTF-8</project.reporting.outputEncoding> <java.version>1.8</java.version> </properties> <dependencies> <dependency> <groupId>org.springframework.boot</groupId> <artifactId>spring-boot-starter-web</artifactId> </dependency> <dependency> <groupId>org.springframework.boot</groupId> <artifactId>spring-boot-starter-test</artifactId> <scope>test</scope> </dependency> </dependencies> <build> <plugins> <plugin> <groupId>org.springframework.boot</groupId> <artifactId>spring-boot-maven-plugin</artifactId> </plugin> </plugins> </build> </project>
De code voor Gradle Build – build.gradle is hieronder gegeven –
buildscript { ext { springBootVersion = '1.5.8.RELEASE' } repositories { mavenCentral() } dependencies { classpath("org.springframework.boot:spring-boot-gradle-plugin:${springBootVersion}") }}apply plugin: 'java'apply plugin: 'eclipse'apply plugin: 'org.springframework.boot'group = 'com.tutorialspoint'version = '0.0.1-SNAPSHOT'sourceCompatibility = 1.8repositories { mavenCentral()}dependencies { compile('org.springframework.boot:spring-boot-starter-web') testCompile('org.springframework.boot:spring-boot-starter-test')}
U kunt een uitvoerbaar JAR-bestand maken, en de Spring Boot applicatie uitvoeren met behulp van de volgende Maven of Gradle commando’s –
Voor Maven, kunt u het onderstaande commando gebruiken –
mvn clean install
Na “BUILD SUCCESS”, kunt u het JAR bestand vinden onder de doelmap.
Voor Gradle kunt u het onderstaande commando gebruiken –
gradle clean build
Na “BUILD SUCCESSFUL”, kunt u het JAR bestand vinden onder build/libs directory.
Nu voert u het JAR-bestand uit met het volgende commando –
java –jar <JARFILE>
Nu is de applicatie gestart op de Tomcat-poort 8080.

Nu kunt u de onderstaande URL’s invoeren in de POSTMAN-toepassing en de uitvoer bekijken.
GET Producten door Rest Sjabloon – http://localhost:8080/template/products
Creëer Producten POST – http://localhost:8080/template/products
Update Product PUT – http://localhost:8080/template/products/3
Verwijder product – http://localhost:8080/template/products/3
